

Introduction
BaseFortify is a practical threat intelligence platform designed to translate vulnerability data into prioritised, actionable insight.
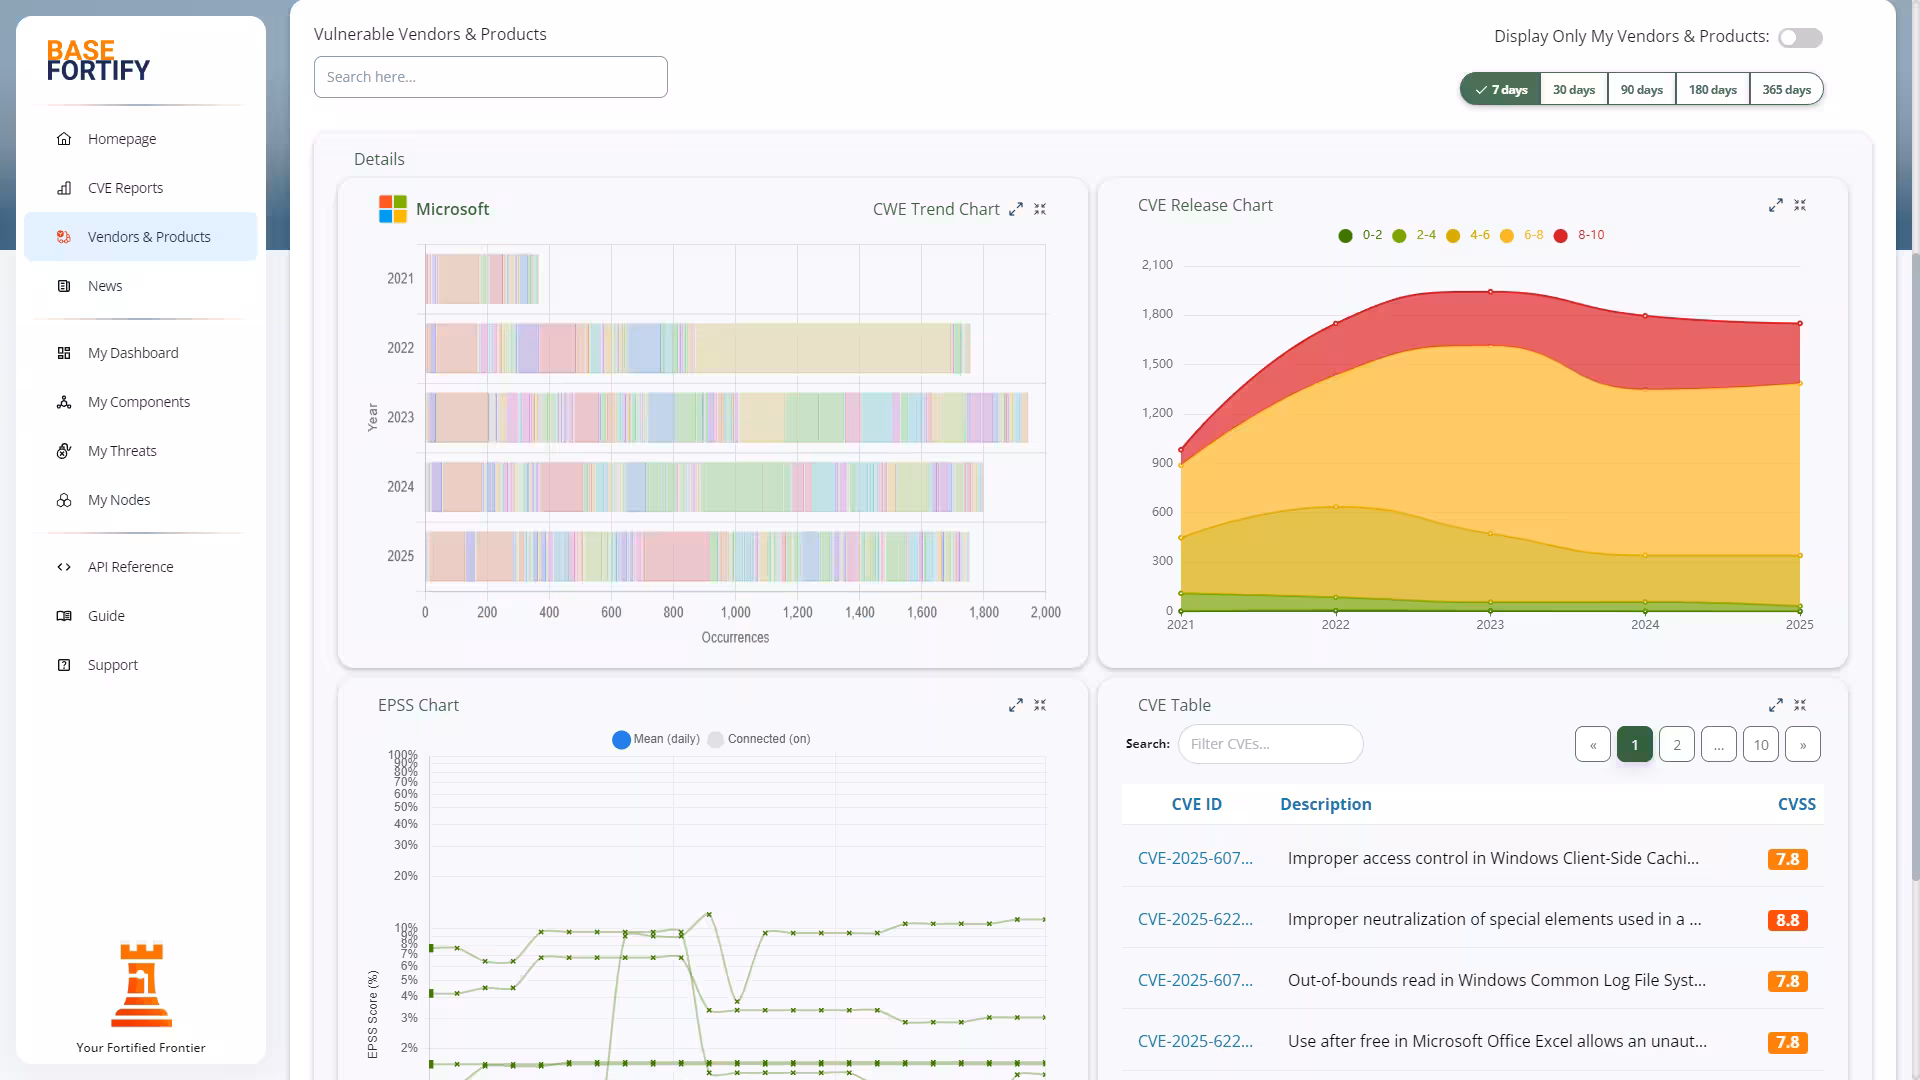
Thousands of vulnerabilities are published every month. The problem isn’t access to data — it’s understanding what actually applies to your environment. BaseFortify removes that complexity by correlating global vulnerability intelligence directly with your systems. Instead of long CVE lists, you receive a focused view of the risks that matter most to you.
Only vulnerabilities that affect your nodes and components are surfaced.
Use CVSS, EPSS, and CISA KEV to see what needs attention first.
Every CVE is expanded with official references, advisories, and research links.
Threats move through clear stages from discovery to completion.
What Is an Attack Surface?
Your attack surface is the sum of all components you run — operating systems, applications, services, and dependencies. Each component introduces potential exposure. The more accurate your attack surface, the more precise your results.
BaseFortify starts with one question:
What are you actually running?
How BaseFortify Works
BaseFortify continuously monitors official and community intelligence feeds and compares them against your environment.
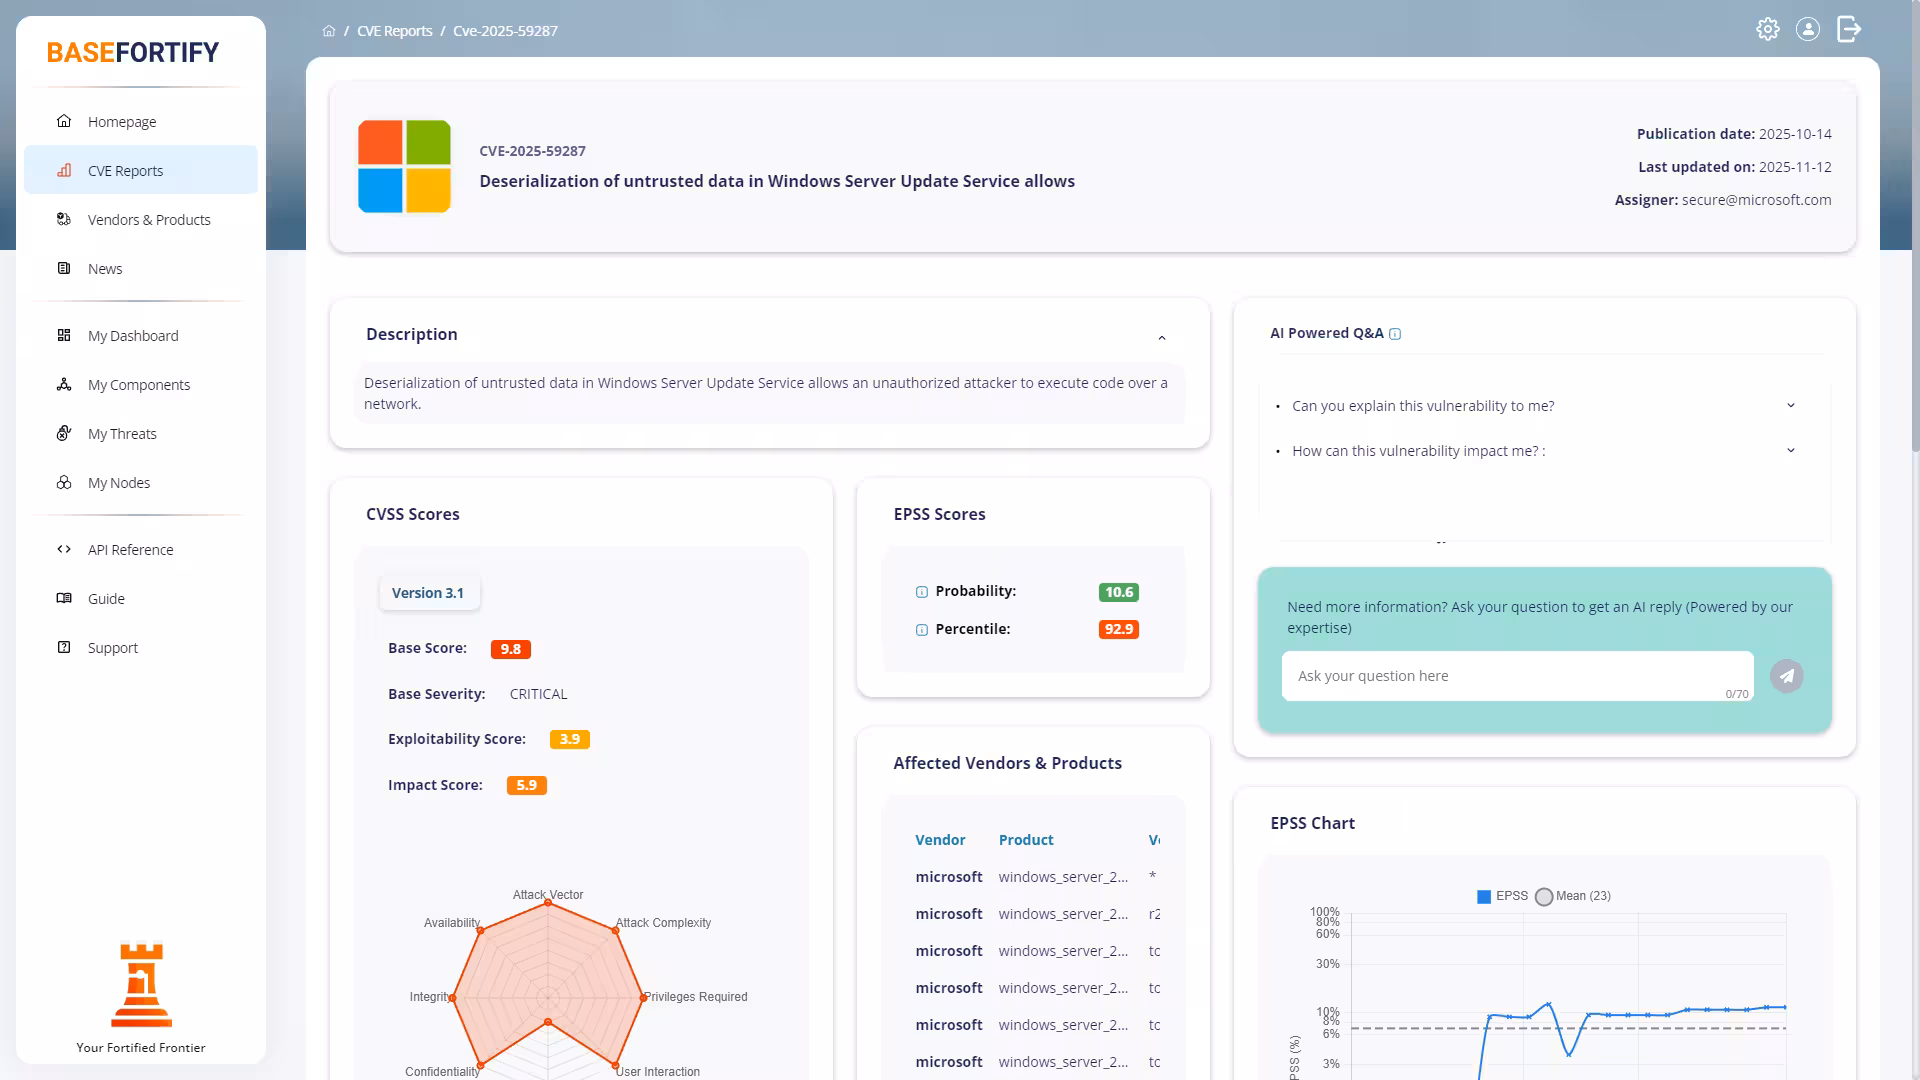
Vulnerabilities are published as CVE reports (Common Vulnerabilities & Exposures) by organisations such as MITRE and the National Vulnerability Database (NVD). Each CVE is enriched with:
| CVSS | Technical severity and impact. |
| EPSS | Probability that the vulnerability will be exploited. |
| CISA KEV | Whether the issue is known to be actively exploited in the wild. |
| CWE | Underlying weakness classification. |
| References | Official advisories, research, and community sources. |
Only vulnerabilities that match your systems become threats. Irrelevant CVEs are automatically filtered out.
Guide pages
Setting Up Your Environment
Step 1 — Define Your Components
After signing in, navigate to My Components and click Add Components to define your attack surface.
You can add components using:
- manual input with smart autocomplete,
- clipboard import (recommended for first-time setup),
- CSV or JSON file upload, or
- REST API integration from other systems.
Step 2 — Collect Installed Software
Use the built-in collection commands for:
- Windows
- macOS
- Linux
Select your OS icon to retrieve the command. For example, on Windows you will see a PowerShell command similar to:
# Example – replace with the exact command from the UI
powershell -ExecutionPolicy Bypass -File .\basefortify-collect.ps1
Run the command on the target system. It will generate a list of installed applications and operating system details that you can copy back into BaseFortify.
Step 3 — Import Into BaseFortify
Paste your results into the input field and click Submit.
On the Add Components screen:
- Choose the correct component type (Application or Operating System).
- Assign a node or tag (for example “Production Servers” or “Finance Laptops”).
- Click Save to begin vulnerability matching.
Understanding Threats
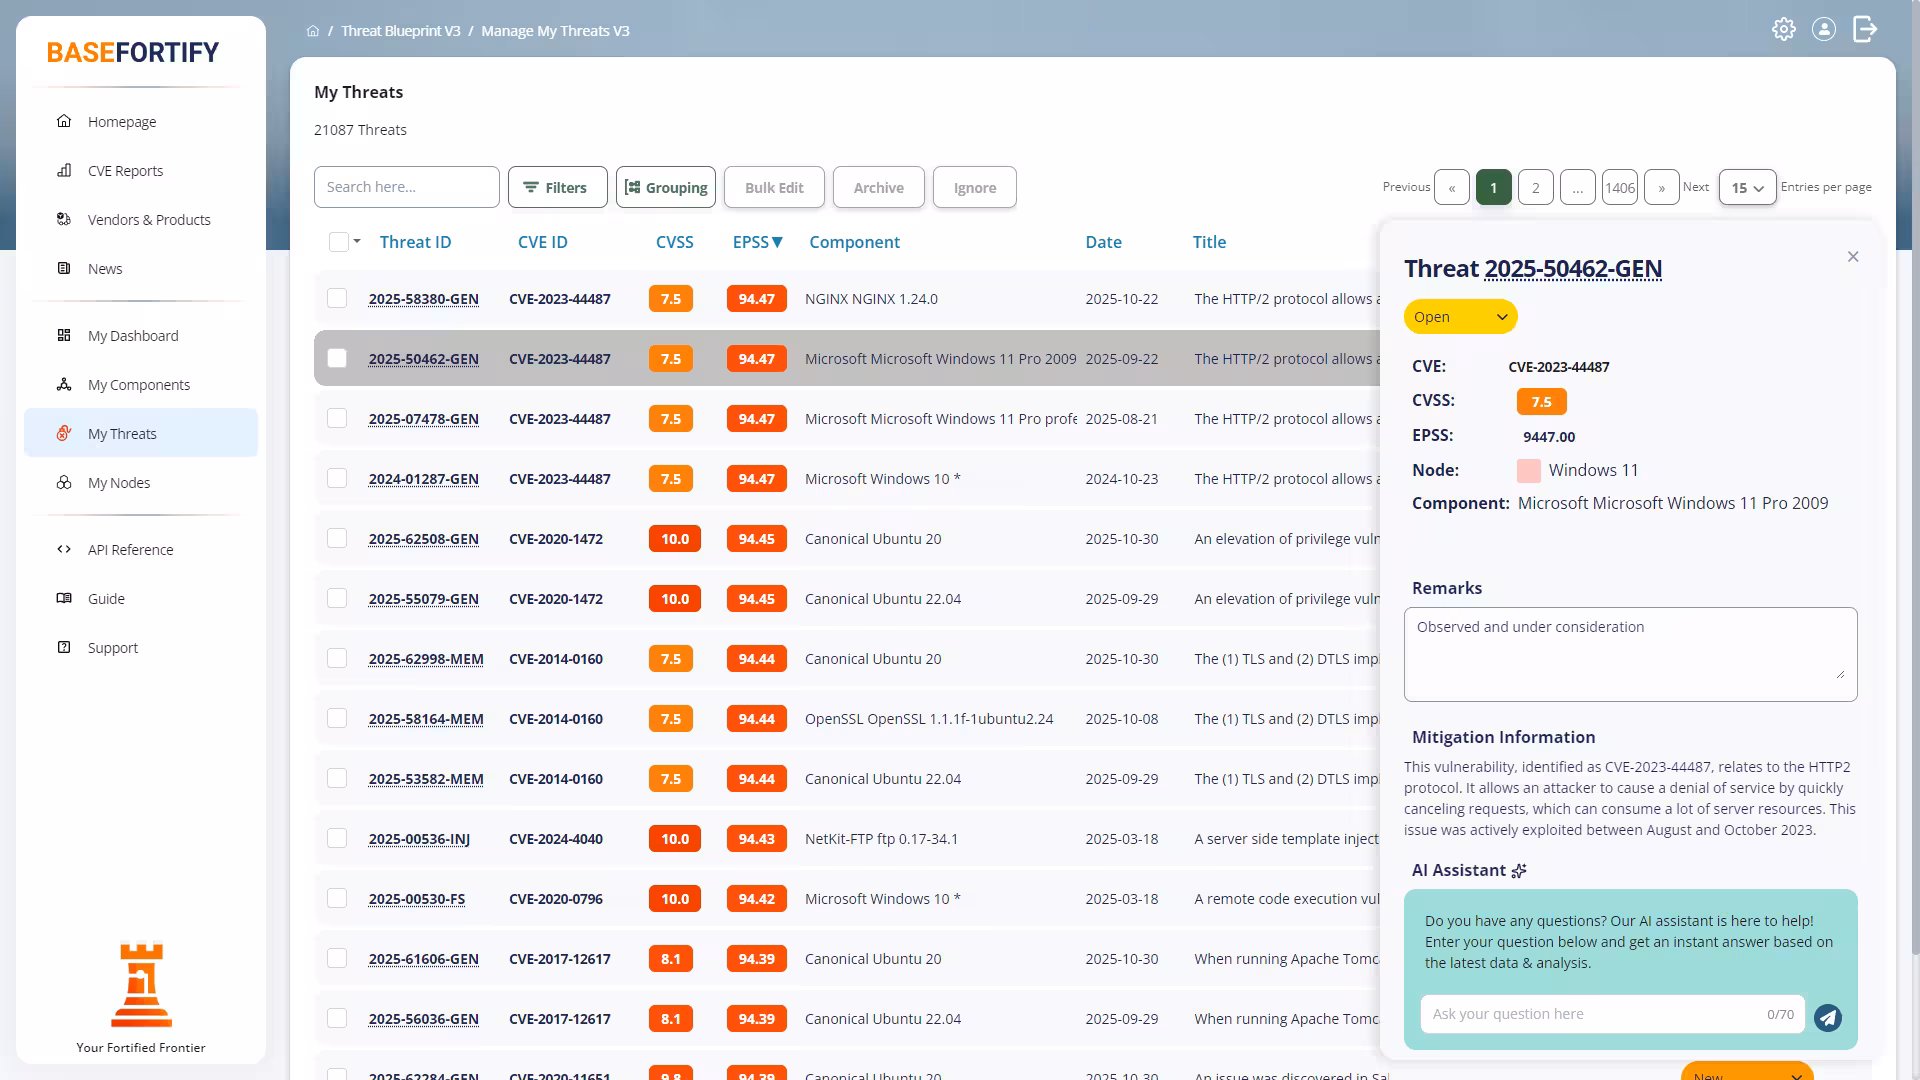
A vulnerability becomes a threat when it matches one or more of your components.
You can explore threats from several views:
- My Dashboard — a prioritised overview of recent and critical threats.
- My Components — threats organised per application or operating system.
- My Threats — the full list with filtering and search.
Each threat links to a detailed CVE report containing technical descriptions, affected versions, severity and probability scoring, exploit indicators, and recommended mitigations.
Threat Status & Workflow
Every threat follows a structured lifecycle so that work is easy to track and report:
| New | BaseFortify has detected a match, but it has not yet been reviewed. |
| Open | The threat has been acknowledged and needs action. |
| In Progress | Mitigation work is underway. |
| Completed | The vulnerability has been remediated. |
| Archived | Completed items moved out of day-to-day views to reduce clutter. |
Priority & Risk-Based Decisions
Not every vulnerability matters equally. BaseFortify helps you decide what to fix first by combining:
- CVSS — how severe the impact could be.
- EPSS — how likely the issue is to be exploited.
- CISA KEV — whether exploitation is already happening in the wild.
Alerts & Notifications
BaseFortify keeps you informed without overwhelming your inbox.
Built-In A.I. Assistance
Every CVE includes access to an A.I. assistant that can:
- explain vulnerabilities in clear, non-technical language,
- suggest practical mitigation steps, and
- help you prepare guidance for colleagues or stakeholders.
Take Control of Your Security
BaseFortify replaces guesswork with clarity. By keeping components up to date, tracking threats through their lifecycle, and using risk-based prioritisation, you can stay ahead of the issues that matter most.
API Reference
What Is It?
The BaseFortify OAuth2 REST API gives developers secure, direct access to your infrastructure and vulnerability data. It supports full Authorization Code and Refresh Token flows for integrating BaseFortify with your own dashboards, scripts, or automation pipelines. All responses are returned as clean, standards-compliant JSON over HTTPS.
Automate node provisioning, synchronize your component inventory, or track vulnerability changes across your organization — all without logging into the web interface.
Who Can Use It?
Every registered BaseFortify customer can use the API. Public
/health endpoints require no authentication, while all other routes
require either a valid session or an OAuth2 Bearer token.
Tokens can be generated directly from your BaseFortify account or dynamically via the
OAuth2 /authorize and /token endpoints.
Key Endpoints
| Authorize | POST /api/v1/auth/authorize — begin OAuth2 authorization flow |
| Token | POST /api/v1/auth/token — exchange or refresh access tokens |
| Nodes | Create, list, and manage BaseFortify nodes |
| Components | Register, track, and update software or hardware components |
| Threats | View, update, and archive detected vulnerabilities |
| Profile | GET /api/v1/auth/profile — retrieve user and scope details |
| Health | Check service availability for each API group |
Base URL & Versioning
All API calls begin with:
https://api.basefortify.eu/api/v1/
For example, GET /api/v1/auth/health returns metadata about the
authentication service.
Authentication
Include your access token in the Authorization header for protected endpoints:
Authorization: Bearer <your-access-token>Tokens are issued per user and expire automatically. Refresh tokens allow renewing access without manual intervention. OAuth2 compliance ensures compatibility with existing tooling.
Getting Started
- Log in to your BaseFortify account (or create one).
- Register an API client under User Settings → API Clients.
- Use your
client_idandclient_secretto request tokens. - Explore the interactive API documentation for live examples.
Development Notes
- Tokens are stored securely and never exposed to third parties.
- Each client can define scopes to limit access.
- Refresh tokens can be revoked or rotated per user.
- The API is designed for automation, auditing, and reporting pipelines.
Why It Matters
The BaseFortify API makes vulnerability intelligence portable and actionable. Integrate findings into your CMDB, SIEM, or ticketing workflows, or automate remediation through custom scripts.
Built entirely in-house and hosted in Europe, the API operates independently of large tech ecosystems — ensuring privacy, transparency, and control.
OpenAPI specification:
api.basefortify.eu/api/v1/auth/openapi.yaml
Questions? Email [email protected]